Configuring iSyncr Desktop for WiFi Syncing
First, make sure you've already installed iSyncr Desktop, and it's up and running. If you double-click the iSyncr desktop icon in your system tray (PCs), or left-click on it in your main menu bar and choose "Open Settings" (Macs), it will show the settings dialog. At this time, the version, hostname, and library name are read-only and cannot be modified. There is also a progress bar which shows you the transfer progress of any file that is currently being downloaded or uploaded.
The main settings to adjust are the following:
- IP Address - An IP address is a number assigned to your computer to uniquely identify it on the network. If your computer belongs to multiple networks, for example if it has a wireless card and an ethernet port, it may even have multiple IP addresses. If so, then whichever IP address you select from the dropdown will be considered the "preferred" IP address for the phone to connect to. Generally speaking, you should try to pick your fastest local network adapter.
- Port - A port is a number indicating a channel of communication to and from your computer, much like selecting a channel on a walkie-talkie. The current default was arbitrarily chosen to be 34000, but you can change this to any value between 1024 and 65535, if you have a reason to do so.
- Password - If you give iSyncr Desktop a password other than the default "Password" (PC) or "Password1" (Mac), then Android phones connecting to iSyncr Desktop on your computer will have to enter it in order to view / sync your library. To change the password, open iSyncr Desktop's "Settings" select "WiFi Settings" and change the "Password".
- Amazon MP3 Path - WiFi supports uploading Amazon MP3s you've purchased via the Amazon MP3 app to your computer; this setting lets you choose where exactly the files are stored on your computer's hard drive.
- Amazon Playlist - This setting lets you choose the name of the playlist that uploaded Amazon MP3s will be added to in iTunes.
- Photo Path - WiFi supports uploading photos you've taken on your Android device to your computer; this setting lets you choose where exactly the files are stored on your computer's hard drive.
- Video Path - WiFi supports uploading videos you've taken on your Android device to your computer; this setting lets you choose where exactly the files are stored on your computer's hard drive.
- Enable notifications - When this setting is on, you may periodically see balloon tip notifications in your system tray, especially when songs are being downloaded or uploaded.
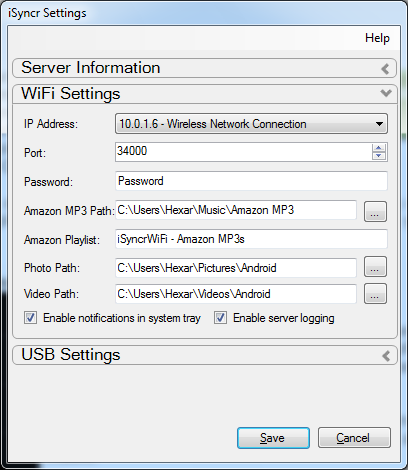
iSyncr Desktop - Windows
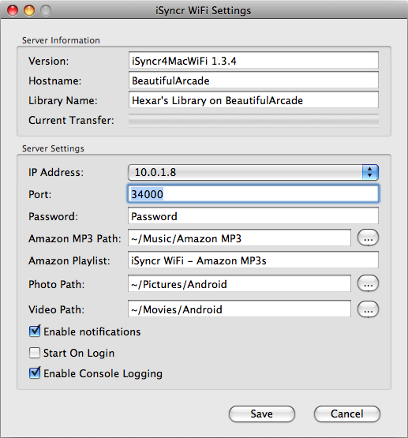
iSyncr Desktop - Mac
Configuring the App
Assuming you have already installed iSyncr on your phone, the rest of the settings are configured within Settings:
- Playlists to Sync - This setting only shows up if you have already connected to a iSyncr Desktop before. It lets you choose the playlists to sync in an "offline" viewing mode. Take care, however, because this list of playlists is not guaranteed to match the current set of playlists on your computer.
- Default Storage - If your phone has both internal and external storage, you will see this option, which lets you choose the default drive where the tracks will be downloaded. You can set specific playlists to sync to a specific drive by performing a long touch on them in the playlist browser while connected to iSyncr Desktop.
- WiFi Sleep Policy - This setting lets you modify your phone's WiFi Sleep Policy directly from WiFi. For best sync results, set this to Never, but keep in mind that it may drain your battery more quickly.
- Synchronization Interval - This setting allows you to specify a schedule for syncing your scheduled playlists. By default it is set to Only Manually, which means it won't sync automatically. But if you want your phone to sync overnight, you can always set this to "Every 4 Hours" or "Every 8 Hours", depending on how long you sleep ;)
- Synchronization Time - If your Synchronization Interval is set to Daily, you can use this setting to specify the exact time at which you'd like WiFi to sync each day.
- Retry Policy - This setting controls how many times the phone will retry commands used to retrieve information from your computer when there are unexpected errors. The default policy (Normal) retries failing commands up to four times, whereas the Aggressive policy will retry up to 50 times. Most people should stick with the Normal policy unless you have a reason to change it.
- Show Notifications - Toggles whether or not the app sends status bar notifications. This is on by default because it makes it less likely that the Android OS will suspend the app during a sync.
- Sync Checked Songs - Toggles whether or not the app will sync songs that are unchecked in your iTunes Library. If set, it will not sync them.
- Delete Abandoned - Toggles whether or not the app will automatically clean up (delete) songs that are not a part of any synced playlist during a sync. Use caution here; if you have previously used iSyncr to sync your entire Music playlist and don't have it selected in WiFi, this option will cause the majority of your music to be automatically removed for you. Turning this option on also limits you to syncing with only one iSyncr Desktop.
- Sync Folder - If you'd rather sync to a folder other than the default "syncr" on your drives, you can specify an alternate sync folder name, such as "Music".
- Upload Amazon MP3s - Toggles whether or not the app will scan the filesystem for Amazon MP3s and attempt to upload them to the iTunes for you.
- Delete MP3s After Upload - Toggles whether or not the app should automatically delete Amazon MP3s on your phone after a successful upload. Take care with this option, since your only copy of these songs will be on your computer after a sync.
- Upload New Photos - Toggles whether or not the app will scan your Android device for photos and upload them to your computer automatically.
- Delete Photos After Upload - Toggles whether or not the app should automatically delete photos from your Android after a successful upload. Take care with this option, since your only copy of these photos will be on your computer after a sync.
- Upload New Videos - Toggles whether or not the app will scan your Android device for videos and upload them to your computer automatically.
- Delete Videos After Upload - Toggles whether or not the app should automatically delete videos from your Android after a successful upload. Take care with this option, since your only copy of these videos will be on your computer after a sync.